
By: Mark Laws
General Manager
Designed for use in the connections and repair of water and wastewater applications, Clover’s unrestrained mechanical couplings (VPC) can be used on a wide range of pipe materials, including:
Please note, Clover VPC couplings do not provide axial pipe restraint and are not suitable for use on polyethylene pipe.
What you’ll need:
- A torque wrench
- Pipe surface cleaning equipment
- Pipe or gasket lubricant, approved for use with potable water
- Fastener lubricant
Useful resources:
See below for recommended torque tightening per pipe product and size:
| Size (DN) | Pipe Size Range (mm) | Tightening Torque (Nm) | Nominal Setting Gap (mm) | Max Deflection Each End (Deg) | Product Code | |
| oPVC | Other Pipe Materials | |||||
| Long Series | ||||||
| 80 | 88-103 | 45 | 60 | 20 | 3 | DGVPC080 |
| 100 | 108-132 | 45 | 60 | 20 | 3 | DGVPC100 |
| 150 | 158-182 | 45 | 60 | 25 | 3 | DGVPC150 |
| 200 | 214-238 | 50 | 60 | 35 | 3 | DGVPC200 |
| 225 | 242-269 | 50 | 60 | 35 | 3 | DGVPC225 |
| 250 | 270-295 | 50 | 60 | 35 | 3 | DGVPC250 |
| 300 | 330-356 | 50 | 60 | 35 | 3 | DGVPC300 |
| 375 | 400-429 | 50 | 60 | 35 | 3 | DGVPC375 |
| 450 | 488-512 | 50 | 60 | 35 | 1.5 | DGVPC450 |
| 600 | 656-680 | 50 | 60 | 35 | 1.5 | DGVPC600 |
| Short Series | ||||||
| 100 | 108-132 | 45 | 60 | 20 | 3 | DGVPC100SB |
| 150 | 158-182 | 45 | 60 | 25 | 3 | DGVPC150SB |
Installing unrestrained mechanical couplings.
Step 1: Inspect and prepare the pipes.
Before you start the installation, examine the pipe ends to ensure they are round and smooth, and free of any dents or score marks. Check to ensure the pipe ends are within the specified tolerance for their material type.
Any weld beads or marks on the pipe ends must be ground smooth, while maintaining the correct surface profile.
Check the pipe ends that will be inserted into the coupling to ensure they are free from rust, scale, and any other marks or build-ups that may affect the performance of the coupling (see Fig. 1).
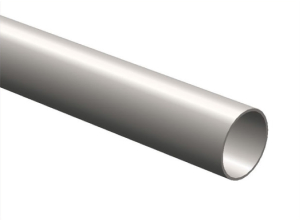
Fig. 1. Check both of the pipe ends that will be inserted into the coupling, to ensure they are ready for installation.
Step 2: Align the pipes.
Align the two pipes you intend to join with the coupling, so they are concentric (or share the same mid-point, regardless of diameter; see Fig. 2). Place a mark on both pipe ends at a distance of half the clamp length, minus half the setting gap of the coupling to be used.
Lubricate the surfaces of the sealing gaskets with an approved lubricant. When you are joining two pipes with varying outside diameters, position the coupling end with the nuts on the pipe with the smaller diameter.
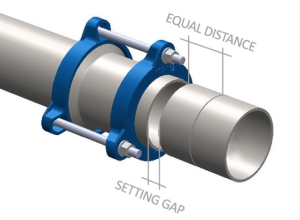
Fig. 2. Concentric placement will ensure the pipes are aligned, regardless of any discrepancy in diameter.
Step 3: Adjust the gaps
Adjust the gap setting between the pipe ends for appropriate coupling (refer to the useful resources section above).
Step 4: Position the coupling over both pipe ends.
Using the marks you created in step 2 as a guide on the pipe ends, slide the coupling to a central position over both pipe ends. To make the next steps of installation easier, rotate the coupling so that all nuts and bolts are easily accessible for tightening.
Step 5: Tighten the nuts and bolts.
When tightening the coupling, be sure to tighten bolts in a diametric star pattern (see Fig. 3 below). Give each nut 1-2 turns at a time (rather than tightening each nut entirely); this will ensure you evenly engage the end rings and gasket assembly.
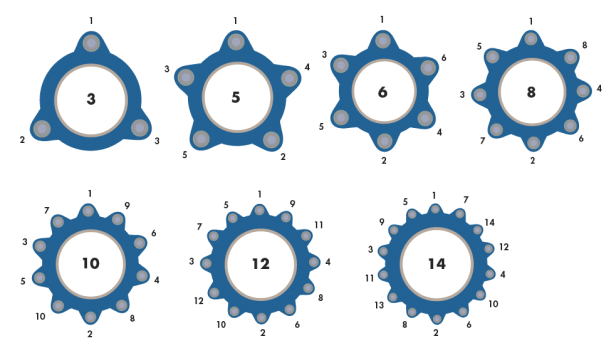
Fig.3. Follow this guide when tightening nuts and bolts, depending on the bolt configuration of your coupling.
Using a torque wrench, tighten all bolts to the correct torque as listed in the recommended torque table from the useful resources section above.
Step 6: Finish up.
Re-tension all fasteners after 30 minutes to compensate for loss of tension through gasket relaxation. We recommend applying an anti-galling lubricant to stainless steel or galvanized fasteners as required.
For more information about the Clover unrestrained mechanical coupling range, head to our product page.